Scraping Wikipedia with Python: Extract Articles and Metadata
Download all source code from GitHub
Table of content
- Introduction
- Installing the Tools You Need
- Verify Installations
- How to Scrape and Clean Data
- Scraping Text with Regular Expressions
- How to Scrape the Wikipedia Infobox
- How to Scrape Wikipedia Tables Using Pandas
- Save Data to CSV
- Visualize the Data
- Build a Custom Database to Store Wikipedia Data
- Error Handling and Debugging During Scraping
- Why Do We Need To Use Proxies in Scraping?
- Ethical Scraping and Legal Considerations

Introduction
Have you ever spent hours on Wikipedia, hopping from one page to another, only to realize how much interesting information you’ve come across? Now imagine if all that data could be automatically collected—that’s where web scraping comes in!
In this project, I’ll walk you through how to scrape Wikipedia. You’ll learn how to extract data from infoboxes (those side boxes on Wikipedia), tables (which can be tricky), and plain text. I’ll also cover how to clean and store that data in useful formats like CSV files, and even show you how to set up a small database.
As a bonus, I’ll provide tips on handling errors and scraping ethically to ensure you’re doing it the right way. Whether you’re curious or need data for a project, I’ll guide you through each step in a simple, easy-to-understand way.
Installing the Tools You Need
First things first, you need the right tools to scrape data from Wikipedia These tools makes data scraping, cleaning and visualization very easy. Just follow these steps to get them installed.
Pandas: Data cleaning,organization and data analysis
Matplotlib: This is used to create plots and graphs (data visualization).
BeautifulSoup (bs4): For scraping and parsing HTML content.
Requests: To get an HTTP request and to fetch a web page.
Let me illustrate each step to install them.
Step 1: Set Up Python
Before anything else, ensure that you have Python installed in your computer. If not you can download it from python official website https://www.python.org. Don’t forget to check “Add Python to PATH” before installing. It simplifies working from the command line with Python.
Step 2: pandas and matplotlib Install
Pandas is going to help you structure data in, what basically will look like a table and Matplotlib is going to be very useful in converting your data into charts or graphs.
To install both copy and paste in your terminal/ command prompt.
pip install pandas matplotlib
Press Enter and both packages will be installed
Step 3: BeautifulSoup & Requests library
Requests a library that you use to download the pages and then Beautiful Soup, which will help us parse the page so we can get what we want.
Run the following command to install them.
pip install beautifulsoup4 requests
This will fetch the required browsers (like Chromium or Firefox) used by Playwright for page scraping.
Verify Installations
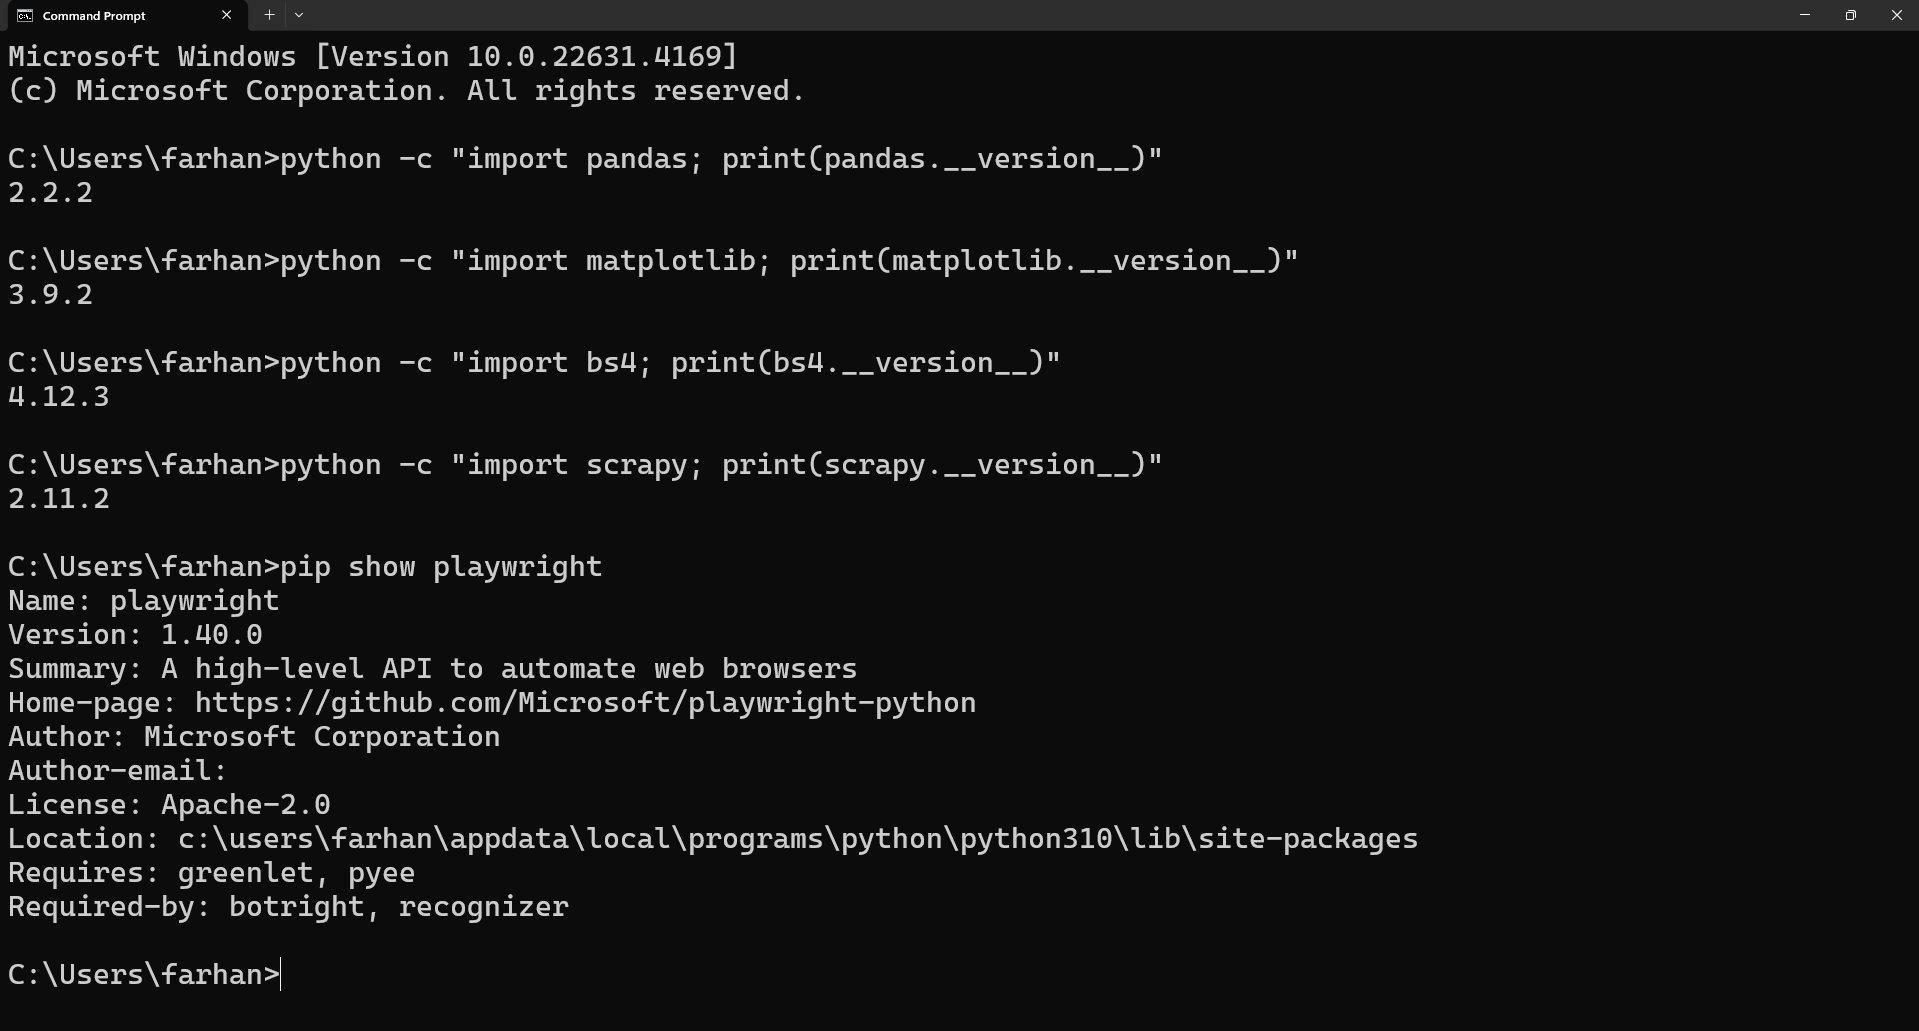
After it is installed you can check if everything works by checking the version of each package by running the following commands:
python -c "import pandas; print(pandas.__version__)"
python -c "import matplotlib; print(matplotlib.__version__)"
python -c "import bs4; print(bs4.__version__)"
python -c "import requests; print(requests.__version__)"
If you see version numbers like below screenshot for all these then you are good.
You have all the tools installed, now it is time to scrape Wikipedia. Let’s get started!
How to Scrape and Clean Data
When it comes to web scraping wikipedia is no different, you need to fetch the HTML content and clean it in order to get some ( usable ) data. Wikipedia pages contain many nonessential elements (e.g. HTML tags, references, special characters), therefore data cleaning is required to retain only the useful info.
Step1: Importing required Libraries
First, we will import requests and BeautifulSoup
import requests
from bs4 import BeautifulSoup
Step 2: Opening the Wikipedia page using a GET Request
We request the Wikipedia page, in this example “Python (programming language)” using an HTTP Request.
url = 'https://en.wikipedia.org/wiki/Python_(programming_language)'

start_time = time.time()
response = requests.get(url)

# Check if the status code is 200, indicating a successful request
if response.status_code == 200:
    print(f"Page fetched in {time.time() - start_time} seconds")
else:
    print("Unable to download the page")
Step 3: Use BeautifulSoup to Parse contents from the HTML Page
When the page is fetched, it separates HTML content and formatted to a structured format with the help of BeautifulSoup.
soup = BeautifulSoup(response.text, 'html. parser')
Soup is now having the whole HTML structure of the page which we could further parse.
Step 4: Data Extraction
Here, we use `soup.find` and `soup.select` for target title and paragraph from html.
# Extract the title and  paragraph
h1_title = soup.find('h1')
print("h1--->", h1_title)

pragraph = soup.select('p:nth-of-type(3)')[0]
print("pragraph--->", pragraph)
Step 5: Data Cleaning
Wikipedia may be filled with extraneous characters, such as citation numbers ([1], [2]). These are the parts that we must minimise.
Get text, strip newline and extra spaces
pragraph = soup.select('p:nth-of-type(3)')[0].get_text().strip().replace('n', ' ')

print("pragraph--->", pragraph)
`strip()` Remove leading and trailing spaces, replace(‘n’, ‘ ‘) This replaces newlines with space.
Remove citation references: [1], [2]
reg_ppattern = r'[d+]'
cleaned_pragraph= re.sub(reg_ppattern,'',pragraph)
print("cleaned_pragraph",cleaned_pragraph)
Example Output
Original Text:
“””Python is dynamically typed and garbage-collected. It supports multiple programming paradigms, including structured (particularly procedural), object-oriented and functional programming. It is often described as a “batteries included” language
due to its comprehensive standard library.[33][34]”””
Cleaned Text:
“””Python is dynamically typed and garbage-collected. It supports multiple programming paradigms, including structured (particularly procedural),
object-oriented and functional programming. It is often described as a “batteries included”
language due to its comprehensive standard library.”””
Full code:
import requests
from bs4 import BeautifulSoup
import time
import re

# The URL of the Wikipedia page you want to scrape
url = 'https://en.wikipedia.org/wiki/Python_(programming_language)'

# Start the timer to measure how long the request takes
start_time = time.time()

# Send an HTTP GET request to fetch the page content
response = requests.get(url)

# Check if the request was successful (status code 200 means success)
if response.status_code == 200:
    print(f"Page fetched in {time.time() - start_time} seconds")  # Print the time taken to fetch the page
else:
    print("Unable to download the page")  # Print an error message if the request fails

# Parse the page content using BeautifulSoup and 'html.parser' to process the HTML
soup = BeautifulSoup(response.text, 'html.parser')

# Extract the first <h1> tag (usually the title of the Wikipedia article)
h1_title = soup.find('h1').get_text().strip()  # .strip() removes any extra spaces or newlines
print("h1--->", h1_title)  # Print the extracted title

# Extract the 3rd <p> (paragraph) tag from the page
# We use nth-of-type(3) to select the 3rd paragraph, and get its text content, then clean up newlines and extra spaces
pragraph = soup.select('p:nth-of-type(3)')[0].get_text().strip().replace('n', ' ')
print("pragraph--->", pragraph)  # Print the raw paragraph text

# Define a regular expression pattern to find and remove references like [1], [2] from the text
reg_ppattern = r'[d+]'

# Use re.sub() to substitute and remove any matches of the regex pattern (i.e., the reference numbers)
cleaned_pragraph = re.sub(reg_ppattern, '', pragraph)

# Print the cleaned paragraph, which now has no reference numbers
print("cleaned_pragraph--->", cleaned_pragraph)
Scraping Text with Regular Expressions
Regex (regular expressions) are extremely powerful for finding patterns in text, which is perfect for scraping structured data out of Wikipedia. Already mentioned above, if you would like to cleanup some unwanted parts (e.g.: citations’s [1], [2] etc) from your string; regex can help tremendously.
import re

# Example of text with citations
text = "Python is a high-level programming language.[1] It was created in 1991.[2]"

# Regular expression to remove citations like [1], [2]
cleaned_text = re.sub(r'[d+]', '', text)

print(cleaned_text)
In this example:
The regular expression r'[d+]' will match any citation number ( i.e., [1], [2], etc.) re.sub() which looks for those matches and replaces them with an empty string, thus deleting them.
For more complex data extraction, e.g. extracting tables, infoboxes or other sections of a page, this method can be further elaborated.
How to Scrape the Wikipedia Infobox
The infobox on a Wikipedia page is that box on the right side with key facts, like important dates, names, and other structured information. It’s super useful when you want to grab summarized data quickly. Scraping the infobox is pretty simple because it follows a consistent structure across Wikipedia pages.
Here’s how you can scrape the infobox using Python and BeautifulSoup.
Step-by-Step Code for Scraping a Wikipedia Infobox
import requests
from bs4 import BeautifulSoup

# Wikipedia page URL
url = 'https://en.wikipedia.org/wiki/Python_(programming_language)'

# Fetch the page
response = requests.get(url)

# Check if the request was successful
if response.status_code == 200:
    # Parse the HTML content
    soup = BeautifulSoup(response.text, 'html.parser')

    # Find the infobox table (usually has class "infobox")
    infobox = soup.find('table', {'class': 'infobox'})

    # Find all rows within the infobox
    rows = infobox.find_all('tr')

    # Loop through rows and extract header (th) and data (td)
    for row in rows:
        header = row.find('th')  # Header cell (like "Developer")
        data = row.find('td')    # Data cell (like "Python Software Foundation")

        if header and data:
            print(f"{header.get_text(strip=True)}: {data.get_text(strip=True)}")
else:
    print("Failed to fetch the page")
Explanation:
- Request the Page: We use requests.get() to fetch the page content from the URL.
- Parse HTML with BeautifulSoup: Once we get the page, BeautifulSoup helps turn that HTML into something we can easily navigate.
- Find the Infobox: We search for the infobox, which is usually inside a <table> with the class “infobox”.
- Extract Data: We loop through each row (<tr>) in the infobox, and for each row, we extract the header (usually in a <th> tag) and the data (in a <td> tag).
Example Output:
When you run this code, you’ll get something like this:
Developer: Python Software Foundation
First appeared: 20 February 1991; 33 years ago(1991-02-20)[2]
Stable release: 3.12.7/ 1 October 2024; 4 days ago(1 October 2024)
This way, you get all the key details from the Wikipedia infobox in a neat and structured format! Simple and effective.
How to Scrape Wikipedia Tables Using Pandas
Scraping tables from Wikipedia is super easy with pandas, which has a built-in method for extracting HTML tables directly. No need to dig into the HTML structure manually — you can grab tables with just one line of code. This makes it perfect for quickly pulling structured data, like tables of countries, statistics, or rankings.
Here’s how to do it using pandas.read_html().
Code for Scraping Wikipedia Tables with Pandas
mport pandas as pd

# Wikipedia page URL
url = 'https://en.wikipedia.org/wiki/List_of_countries_and_dependencies_by_population'

# Use pandas' read_html to scrape all tables from the page
tables = pd.read_html(url)

# Check how many tables were found
print(f"Total tables found: {len(tables)}")

# Display the first table (index 0)
df = tables[0]
print(df.head())

# Save the DataFrame to a CSV file
df.to_csv('wikipedia_data.csv', index=False)
Explanation:
- read_html(): Pandas `read_html()` is an inbuilt function that automatically parses the given URL and extracts all tables from it. You can choose a specific list element to view a certain table (e.g., tables[0] for first table) and convert it into a DataFrame to make analysis easier.
- Extracting Tables: In the example above, `tables = pd.read_html(url)` pulls all the tables from the Wikipedia page and stores them in a list.
- Viewing the Table: You can select and display a specific table by indexing into the list (e.g., tables[0] for the first table) and turning it into a DataFrame for easy analysis.
Example Output:
    Rank Country/Dependency  Population
0     1              China  1,412,600,000
1     2              India  1,366,000,000
2     3    United States   331,883,986
Why Use Pandas for Scraping Tables?
- Simplicity: With `pandas.read_html()`, you don’t need to worry about the HTML structure at all. It automatically parses the tables for you.
- Multiple Tables: It can handle multiple tables on the page and store them in a list of DataFrames, which is ideal when you need to scrape multiple sets of data at once.
- Easy Export: You can easily export the tables to a CSV or Excel file for further analysis with pandas.
Save Data to CSV
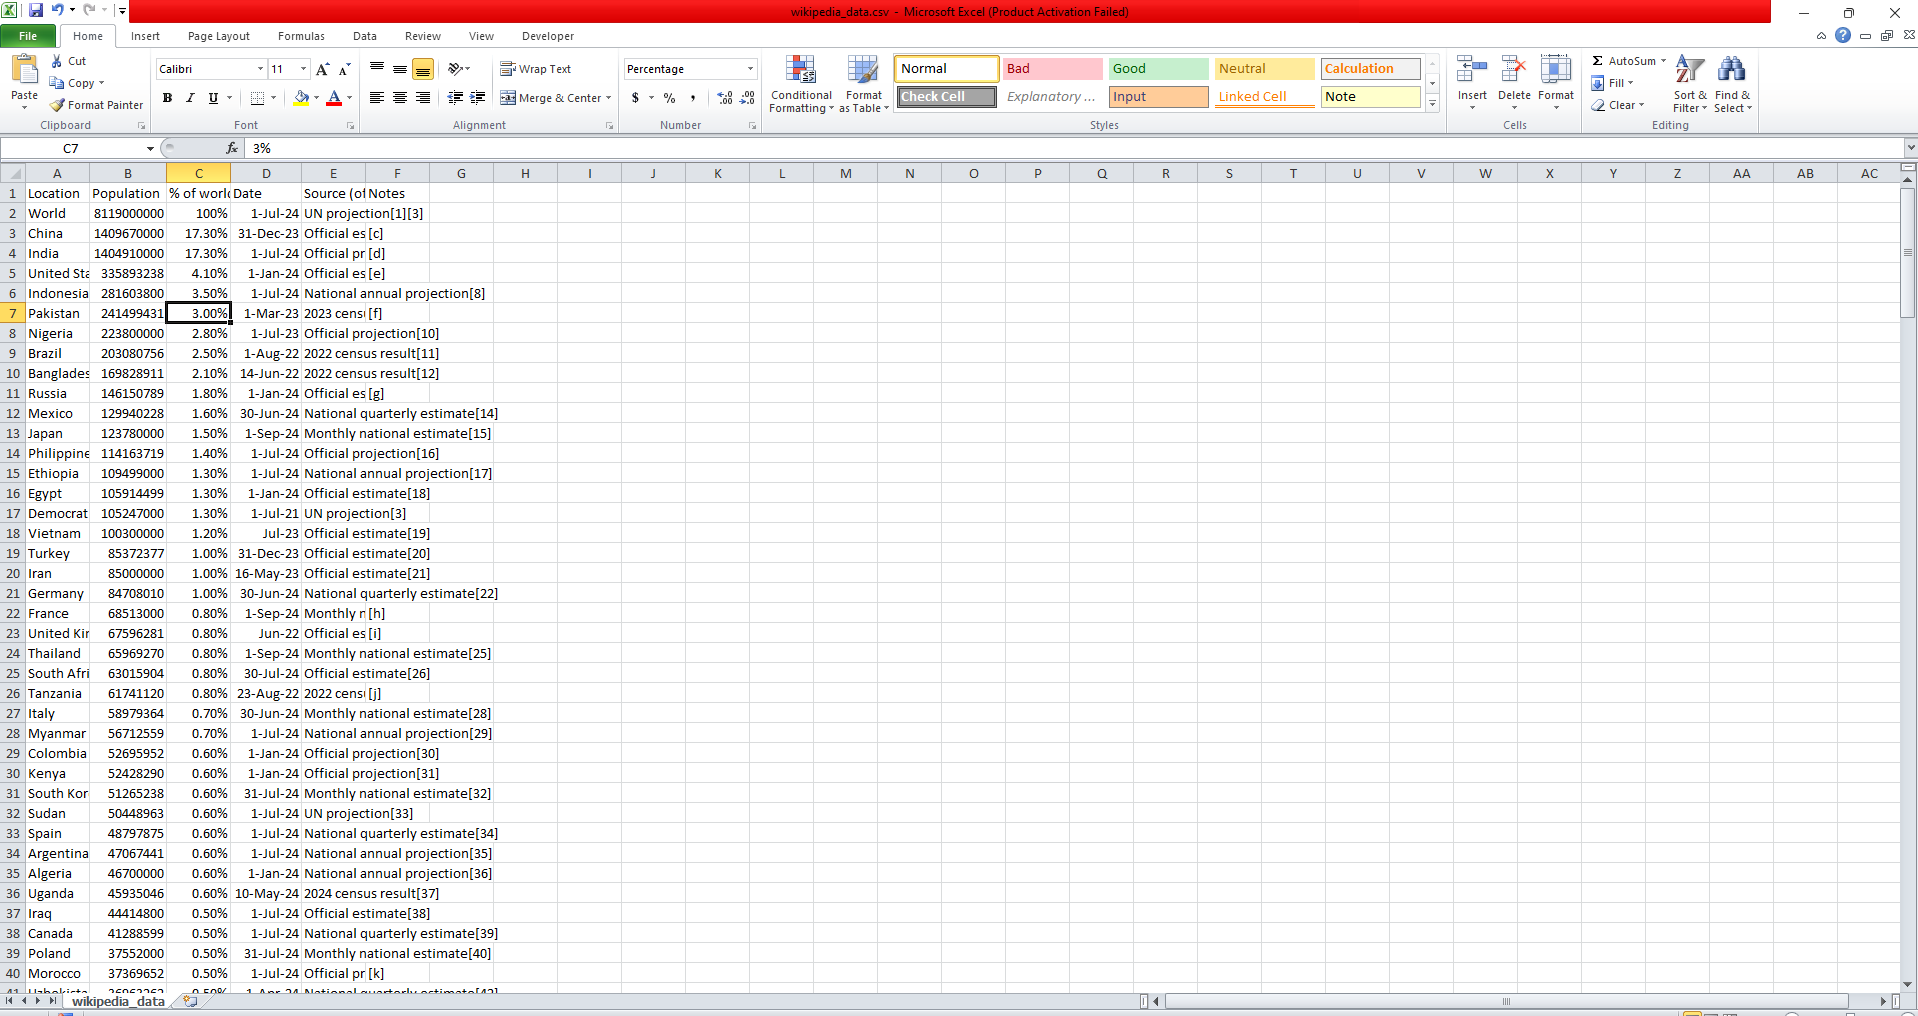
After you finish scraping the data, a lot of times it can be useful to save it for later use or processing. The most simple example is to save the data just into a CSV file, which is a vertically aligned table and that´s why it is used in many applications. Here is a quick way to save the scraped data into a csv file using pandas.
df.to_csv('wikipedia_data.csv', index=False)
Explanation:
to_csv(): This function saves your DataFrame (df) in a file called wikipedia_data.csv.
index=False: This prevents DataFrame index to be saved in the CSV file as an additional column.
Here I attached screenshot how the csv result will be look like
Visualize the Data
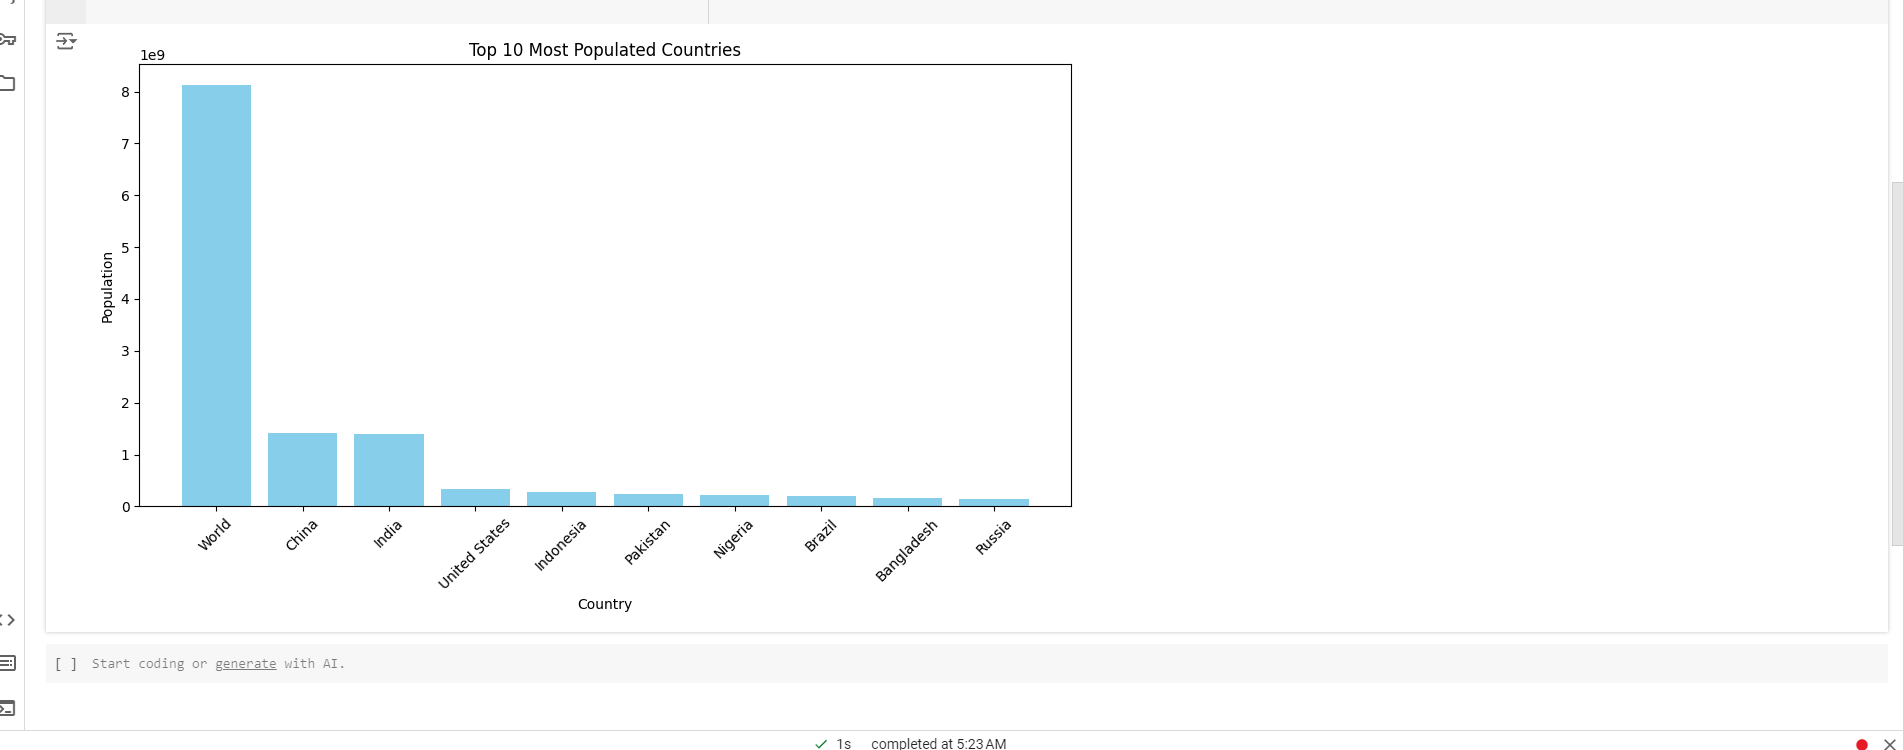
When you have an organized data after scraping, it will be easy for you to understand patterns and insights by visualizing the same. For our example, we will visualize a top 10 table of countries and their populations that we scraped from Wikipedia using an easy bar chart.
Code for the Visualization part Step by step.
import pandas as pd
import matplotlib.pyplot as plt

# Wikipedia page URL
url = 'https://en.wikipedia.org/wiki/List_of_countries_and_dependencies_by_population'

# Scrape the table using pandas
tables = pd.read_html(url)

# Extract the first table (usually the most relevant one)
df = tables[0]

# Clean the data: Remove any rows with missing 'Population' data
df = df.dropna(subset=['Population'])

# Ensure 'Population' column is treated as string, then remove commas and convert to integers
df['Population'] = df['Population'].astype(str).str.replace(',', '').str.extract('(d+)').astype(int)

# Select the top 10 countries by population
top_10 = df[['Location', 'Population']].head(10)  # Use 'Location' as the country name

# Plot a bar chart
plt.figure(figsize=(10, 6))
plt.bar(top_10['Location'], top_10['Population'], color='skyblue')

# Add labels and title
plt.xlabel('Country')
plt.ylabel('Population')
plt.title('Top 10 Most Populated Countries')
plt.xticks(rotation=45)  # Rotate country names for better readability
plt.tight_layout()  # Adjust layout to prevent label cutoff

# Show the plot
plt.show()
Explanation:
- Scrape the Table: We use `pandas.read_html()` to scrape the table from Wikipedia, which returns a list of DataFrames. We work with the first table (`tables[0]`).
- Clean the Data: We clean the ‘Population’ column by removing commas and converting the population figures from strings to integers. We also remove any rows with missing population data.
- Select Top 10 Countries: Using `df.head(10)`, we select the first 10 rows, which represent the top 10 countries by population.
- Create a Bar Chart:
- We use `plt.bar()` to create a bar chart of the top 10 most populated countries.
- The `xlabel` and `ylabel` functions add labels to the axes, and title sets the chart title.
- `xticks(rotation=45)` rotates the country names on the x-axis for better readability.
- Show the Plot: Finally,` plt.show()` displays the bar chart.
Here is a screenshot of how the Matplotlib visual result will look:
Build a Custom Database to Store Wikipedia Data
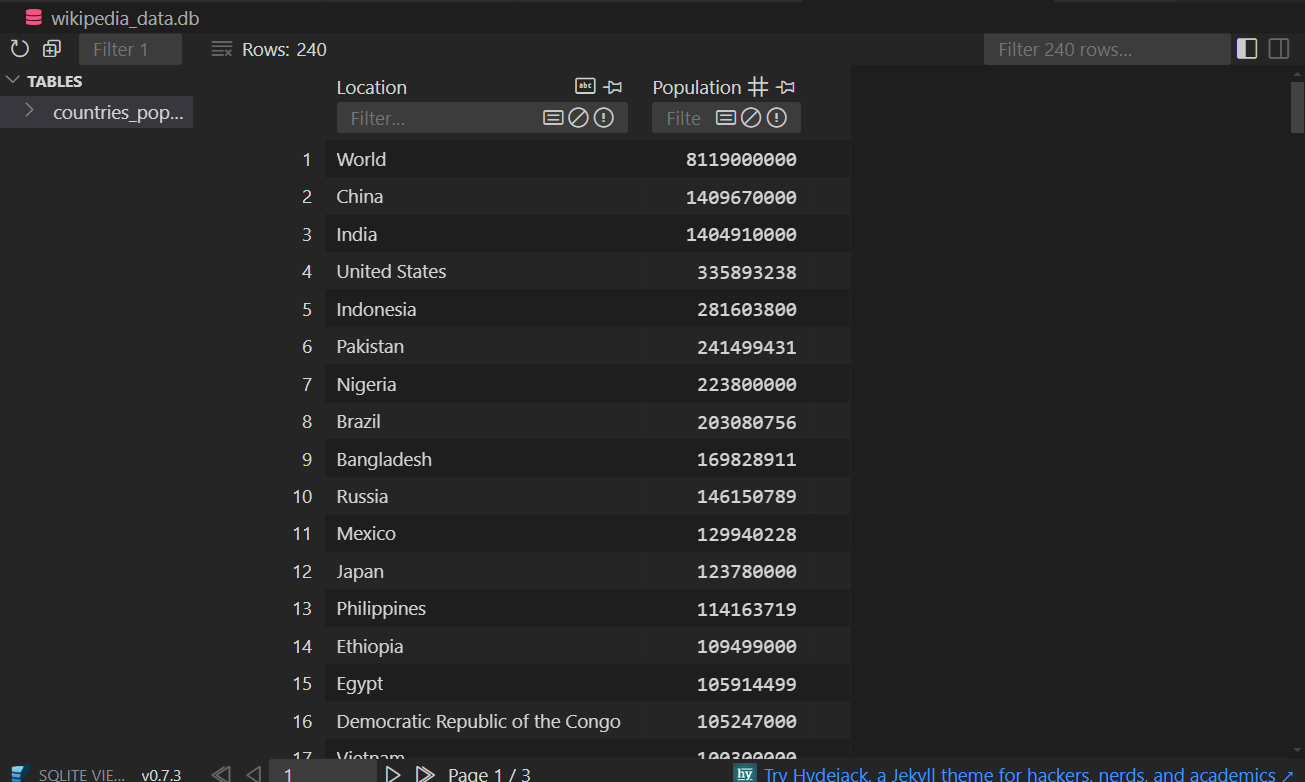
It is a good approach to store the data into your custom database. It enables you to work efficiently with a large set of data, and do heavy lifting queries. Let’s learn how you can store your scraped wikipedia data in an SQLite database
Step-by-Step Code to Build and Store Data in SQLite
import pandas as pd
import sqlite3

# Wikipedia page URL
url = 'https://en.wikipedia.org/wiki/List_of_countries_and_dependencies_by_population'

# Scrape the table using pandas
tables = pd.read_html(url)

# Extract the first table (usually the most relevant one)
df = tables[0]

# Clean the data: Remove any rows with missing 'Population' data
df = df.dropna(subset=['Population'])

# Ensure 'Population' column is treated as string, then remove commas and convert to 64-bit integers
df['Population'] = df['Population'].astype(str).str.replace(',', '').str.extract('(d+)').astype('int64')

# Select relevant columns
df = df[['Location', 'Population']]

# Connect to SQLite (or create the database if it doesn't exist)
conn = sqlite3.connect('wikipedia_data.db')

# Store the data in a new table called 'countries_population'
df.to_sql('countries_population', conn, if_exists='replace', index=False)

# Confirm the data is stored by querying the database
result_df = pd.read_sql('SELECT * FROM countries_population', conn)
print(result_df.head())

# Close the connection
conn.close()
Explanation:
- Scrape the Data: As in our previous examples, we scrape a table from a Wikipedia page and clean the data by removing missing values and converting the population column into integers.
- Connect to SQLite: We use `sqlite3.connect()` to create a connection to an SQLite database. If the database doesn’t exist, SQLite will create it for you. In this example, the database is named `wikipedia_data.db`.
- Store Data in the Database:
- `df.to_sql()` saves the DataFrame as a new table in the SQLite database. The table is named `countries_population`, and the `if_exists=’replace’` option ensures that any existing table with the same name will be replaced.
- Query the Database: To confirm the data was successfully stored, we use `pd.read_sql()` to run a SQL query `(SELECT * FROM countries_population)` that retrieves all the data from the table. We then print out the first few rows to verify the data.
- Close the Connection: After we’re done, we close the database connection using `conn.close()`
See the screenshot of the results from our SQLite database
Error Handling and Debugging During Scraping
While scraping websites like Wikipedia errors can occur, they may be caused by connection problems, the lack of some information or entries in improper formats. Gaining complete control over your script is important for debugging and error handling which in turn provides better reliability. One simple way to achieve this task would be to use the logging module of python which provides you with a pretty handy way to see what is happening inside your script without breaking its execution.
Here’s how to handle common errors during scraping:
import requests
import logging
from bs4 import BeautifulSoup

# Set up logging to log to a file
logging.basicConfig(filename='scraping.log',
                    level=logging.INFO,
                    format='%(asctime)s - %(levelname)s - %(message)s')

url = 'https://en.wikipedia.org/wiki/Python_(programming_language)'

try:
    # Fetch the webpage
    response = requests.get(url)
    response.raise_for_status()  # Raise an error for bad requests
    logging.info(f"Successfully fetched the page: {url}")
except requests.exceptions.RequestException as e:
    logging.error(f"Error fetching the page: {url} | {e}")
    exit()

# Parse the page content
soup = BeautifulSoup(response.text, 'html.parser')

# Safely find an element and log if missing
infobox = soup.find('table', {'class': 'infobox'})
if infobox:
    logging.info("Infobox found!")
else:
    logging.warning("Infobox not found!")
Explanation:
- Logging setup: Logs messages to a file `(scraping.log)` with timestamps.
- Error Handling: Catches connection errors with `try-except` and logs them.
- Debugging: Checks if the `infobox` exists and logs a warning if it’s missing.
Why Do We Need To Use Proxies In Scraping?
Let’s say we are scraping websites such as Wikipedia, or any other large website, it’s essential to not crash the server by sending out too many requests at once. If a site notices you have been making numerous requests they may opt to block your IP.
In this tutorial, I’m using Rayobyte Proxy (you can use any proxy service you prefer). Here’s a simple demo of how to use proxies in your scraping code.
import requests
import logging
from bs4 import BeautifulSoup

# Set up logging
logging.basicConfig(filename='scraping.log', level=logging.INFO, format='%(asctime)s - %(levelname)s - %(message)s')

# Proxy setup (replace with your proxy details)
proxies = {

     "https": "http://PROXY_USERNAME:PROXY_PASS@PROXY_SERVER:PROXY_PORT/"
}

url = 'https://en.wikipedia.org/wiki/Python_(programming_language)'

try:
    # Send request through a proxy
    response = requests.get(url, proxies=proxies)
    response.raise_for_status()  # Check if the request was successful
    logging.info(f"Successfully fetched the page: {url} using proxy")
except requests.exceptions.RequestException as e:
    logging.error(f"Error fetching the page with proxy: {e}")
    exit()

# Parse the content
soup = BeautifulSoup(response.text, 'html.parser')
print(soup.title.string)  # Example: print the title of the page
Ethical Scraping and Legal Considerations
Scraping is useful, but it’s important to be ethical and follow rules to avoid trouble.
Check `robots.txt`: See what the site allows for scraping.
Don’t overload servers: Add delays to avoid overwhelming the site.
Avoid sensitive data: Only scrape public information.
Follow Terms of Service: Some sites don’t allow scraping.
Respect copyright: Give credit when using data.
Staying ethical and following legal guidelines ensures your scraping is responsible and avoids issues.


Responses