Build a Google Play Scraper using Puppeteer and Node.js

Google Play hosts millions of apps, making it a valuable resource for developers and marketers.
In this tutorial, we’ll guide you through building a Google Play scraper using Puppeteer and Node.js. You’ll learn how to extract app details, ratings, reviews, and more, providing you with the tools to analyze app store data for research or competitive analysis.
All the code for this tutorial can be found here: Play Store Scraping
Table of Content
- Introduction
- What is Puppeteer
- Defining the goal of the project
- Setting up the project
- Navigating to the Google Play page
- Executing the search query
- Extracting all results links
- Navigating to all application pages
- Scraping important data
- Collect all data in one array
- Saving the data in a JSON file
- Wrapping things up
- Conclusion
Introduction
The Google Play Store is a goldmine of applications spanning countless categories, from productivity tools to entertainment must-haves. For developers, marketers, and data enthusiasts alike, tapping into this reservoir of data can unlock valuable insights into app trends, user behavior, and market dynamics. Whether looking to dive deep into app ratings, explore reviews, or analyze other critical metrics, scraping Google Play data can empower you to make informed decisions.
Yet, the sheer volume of apps makes manual data extraction an overwhelming task. That’s where web scraping comes to the rescue. In this tutorial, we will show you how to build a Google Play scraper using Puppeteer. This powerful Node.js library provides a high-level API to control headless Chrome or Chromium browsers. By the time you reach the end of this guide, you’ll have a fully functional scraper capable of automating the collection of data from the Play Store, streamlining your research or competitive analysis efforts.
What is Puppeteer?
Puppeteer is a remarkable Node.js library developed by the Google Chrome team that lets you wield control over a headless browser, a browser that operates without a graphical user interface. This makes Puppeteer an ideal tool for web scraping, automated testing, and even generating screenshots or PDFs of web pages.
With Puppeteer, you can programmatically navigate to web pages, interact with elements, and extract content, simulating the experience of manual browsing. It comes with a robust API to manage various browser actions, like clicking buttons, typing into fields, and even handling more complex scenarios like user authentication or navigating dynamic content.
In this project, we’ll harness the power of Puppeteer to traverse the Google Play Store, execute search queries, and scrape detailed information about apps, including ratings, reviews, and other key data. Puppeteer’s ability to handle JavaScript-heavy pages is what makes it perfect for this task, as many modern websites, including the Play Store, rely heavily on client-side rendering.
Defining the Goal of the Project
Before we jump into coding, it’s essential to define the goal of our project. Our scraper needs to take a search query as input, this could be a category, genre, or specific keywords that align with the apps you’re interested in analyzing. Once we have this search query, our scraper will navigate to the Google Play Store and execute the search.
But we won’t stop there. After retrieving the search results, our scraper must open each app’s page individually. This step is crucial because the detailed information we’re after, such as app descriptions, ratings, and reviews, can only be accessed from each app’s dedicated page. By automating these steps, we can efficiently gather a comprehensive dataset, ready for your analysis or research.

Setting up the Project
Alright, enough with the theory, let’s roll up our sleeves and get our hands dirty with some code!
🚀 We’re about to dive into the exciting world of web scraping, but first, we need to set up our environment. Let’s kick things off by creating a brand-new Node.js project.
Step 1: Check Your Node.js Installation
Before we jump in, let’s make sure Node.js is installed on your machine. Open your terminal and type:
node -v
If Node.js is installed, you’ll see the version number pop up. 🎉 If not, no worries! You can download it from the official Node.js LTS Download Page. Just follow the instructions, and you’ll be up and running in no time.
Step 2: Create a New Node.js Project
With Node.js ready to go, let’s create our project.
First, create a new directory for your project, open your terminal in that directory, and run:
npm init -y
And just like that, you’ve created a Node.js project! 🥳
Pro Tip: It’s a great idea to open your project in Visual Studio Code or your favorite code editor. It’ll make navigating and editing your code a breeze!
Step 3: Install Puppeteer
Now, it’s time to bring Puppeteer into the mix. Puppeteer is our secret weapon for controlling the browser. To install it, open your terminal in the project directory and type:
npm install puppeteer
Sit tight while Puppeteer downloads. Once it’s done, you’re ready to start writing some code! 💻
Step 4: Set Up Your Project’s Structure
With Puppeteer installed, let’s create the main script that will handle all our web scraping magic. In the root of your project, create a file named index.js. This is where the fun begins!
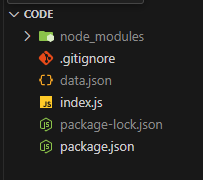
Start by requiring the Puppeteer package we just installed:
const puppeteer = require('puppeteer')
Next, we’ll create an asynchronous function where all our scraping logic will live. This function will take a searchQuery as a parameter, which we’ll use to search for apps on Google Play:
async function run(searchQuery) {
   // All of our magic happens here!
}
run("Fun Games")
Step 5: Launch the Browser
Let’s bring the browser to life! We’ll use Puppeteer’s launch function to create a new browser instance:
const browser = await puppeteer.launch({
        headless: false // We want to see what's happening!
    })
The headless: false option keeps the browser UI visible so you can watch Puppeteer in action. It’s super helpful when you’re just getting started.
Next, we’ll create a new page where all our browser actions will take place:
const page = await browser.newPage()
Now your code should look something like this:
const puppeteer = require('puppeteer')
async function run(searchQuery) {
    const browser = await puppeteer.launch({
        headless: false,
        defaultViewport: false
    })
    const page = await browser.newPage()
}


run("Fun Games")
Step 6: Run Your Project
You’ve set up everything, let’s see it in action! Run the project by typing the following command in your terminal: node index.js

And voilà! 🎉 You should see the browser spring to life, ready for the next steps in our scraping journey.
Now that we’ve got our project up and running, it’s time to navigate to the Google Play Store and start scraping some data! Buckle up, because this is where the real fun begins! 🤓
Navigating to the Google Play page
Now it’s time to set our sights on the target, the main page of the Google Play Store. This is where all the action happens! 🎯
To get there, we’ll use the page.goto() function. This nifty function takes the URL of the page we want to visit and an options object that controls how we navigate. We’re particularly interested in the waitUntil property, which we’ll set to “domcontentloaded” to ensure that all the DOM elements are fully loaded before we proceed.
await page.goto('https://play.google.com/store/games?hl=en', {
        waitUntil: "domcontentloaded"
    })
)
And just like that, we’re in the Play Store’s games section, ready to execute our search command! 🎮
Pro Tip: Don’t forget to add the await keyword before any asynchronous function calls, like page.goto(). This ensures that your code waits for the navigation to complete before moving on to the next step.
With the page loaded, we’re all set to start interacting with the Play Store and search for the apps we’re interested in. Let’s get to it!
Executing the search query
Now, let’s get down to the exciting part, executing our search query! 🎯
Step 1: Open your Browser and Navigate
First, we need to open our local browser and navigate to the Google Play Store page we’ve been working with. To interact with the page elements, we’ll need to use Chrome’s DevTools, which you can easily open by pressing F12. This is where the real magic happens!
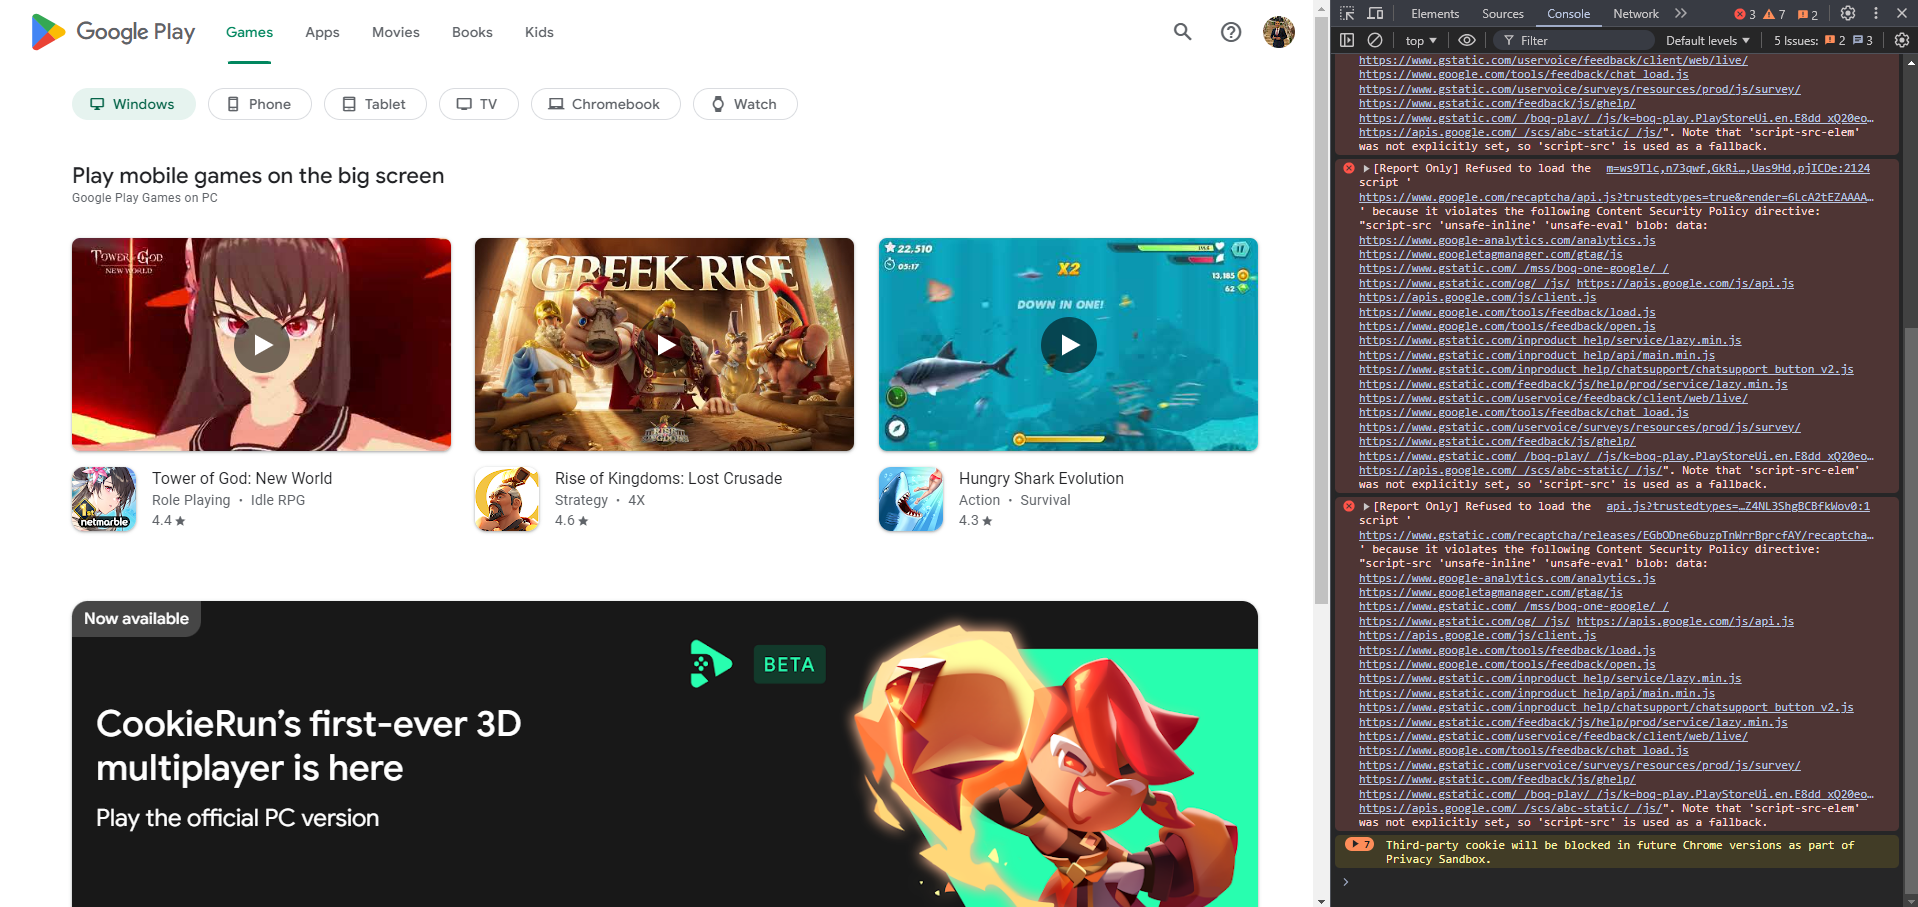
Step 2: Inspect and Select the Search Button
With DevTools open, select the inspector tool (the little arrow icon at the top left of the DevTools window) and click on the search button on the page. This will highlight the element in the DOM tree.
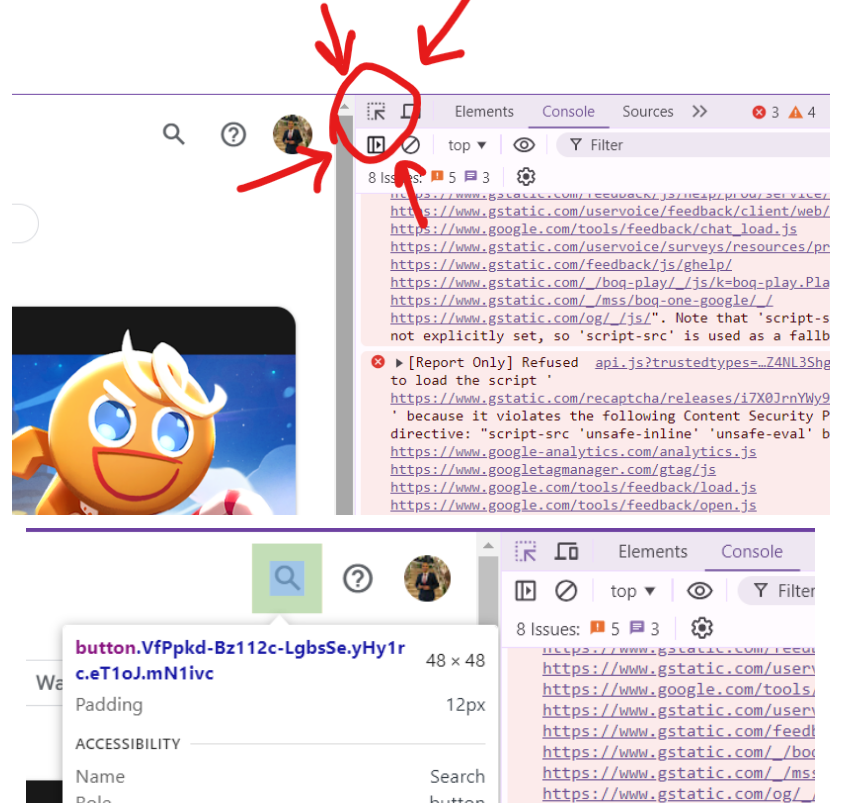
Right-click on the highlighted element in DevTools and choose Copy > Copy selector. This copies the exact selector you need to target the search button in your script.
Step 3: Automate the Search Button Click
Now, we’ll tell our Puppeteer script to wait for this search button to load, and then click it:
await page.waitForSelector('#kO001e > header > nav > div > div:nth-child(1) > button')
await page.click('#kO001e > header > nav > div > div:nth-child(1) > button', {
    delay: 20
})
Boom! Your script will now locate and click the search button just like you would.
Step 4: Target the Input Field
Next, we’ll do the same for the search input field. Use the inspector tool again to select the input field, copy the selector, and then plug it into our script.
We’ll wait for the input field to load, type in our search query, and simulate pressing the Enter key:

await page.waitForSelector('#kO001e > header > nav > c-wiz > div > div > label > input')
await page.type('#kO001e > header > nav > c-wiz > div > div > label > input', searchQuery)
await page.keyboard.press("Enter")
Step 5: Run the Code and Watch the Magic Happen
Now, let’s run the code and see it in action! 🏃♂️

As you can see, everything works like a charm. Your script smoothly navigates to the Play Store, clicks the search button, and types in your query, just as if you were doing it manually.
With this in place, you’re ready to move on to scraping the results. Let’s keep the momentum going!
Extracting All Results Links
Now that our search query has been executed and the results are displayed, it’s time to extract the links to each app in the search results. This is a crucial step because we need to visit each app’s dedicated page to gather detailed information.
Step 1: Wait for the Results to Load
Before we start extracting links, we need to ensure that all the search results have been fully loaded on the page. We can do this by waiting for a specific element that is present in the results, like the container holding the search results:
await page.waitForSelector('#yDmH0d > c-wiz:nth-child(7) > div > div > c-wiz > c-wiz > c-wiz > section > div > div > div > div > div > div.VfPpkd-aGsRMb > div > a')
Hint: Use Chrome’s DevTools to copy the selector of any container element on the page.
Step 2: Extract the Links
Once the search results have loaded, we can use Puppeteer to select all the app links on the page. We’ll do this by using the page.$$eval() function, which allows us to run a function in the context of the page to grab all the anchor (<a>) tags that contain links to the app pages.
Here’s how you can do it:
const links = await page.$$eval('#yDmH0d > c-wiz:nth-child(7) > div > div > c-wiz > c-wiz > c-wiz > section > div > div > div > div > div > div.VfPpkd-aGsRMb > div > a', allAnchors => allAnchors.map(anchor => anchor.href));
In this code, we select all the anchor tags within elements that have the selector we copied and then map over them to extract the ‘href’ attribute, which contains the URL.
Step 3: Check the Extracted Links
After running the extraction, it’s always a good idea to check if everything worked as expected. You can log the extracted links to the console like this:
console.log(links)
his will print an array of URLs, each pointing to a different app’s page. If you see a list of URLs in your console, congratulations, you’ve successfully extracted the links to all the search results! 🎉
Scraping Each Application Page
Alright, now that we’ve got all the app links in our pocket, it’s time to dive into the heart of our mission, scraping each app page for those juicy details we’re after. This is where the fun begins! 🚀✨
To kick things off, we’re going to create a trusty sidekick function called extract. This little helper will take the URL of each app page, swoop in, and return a treasure trove of data for us.
async function extract(url) {
   // Adventure begins here!
}
But before we set extract loose, let’s do some reconnaissance. Let’s manually visit an application page, to scope out what we need to collect and identify the best selectors to use. It’s like being a detective on the hunt for clues! 🕵️♂️🔍
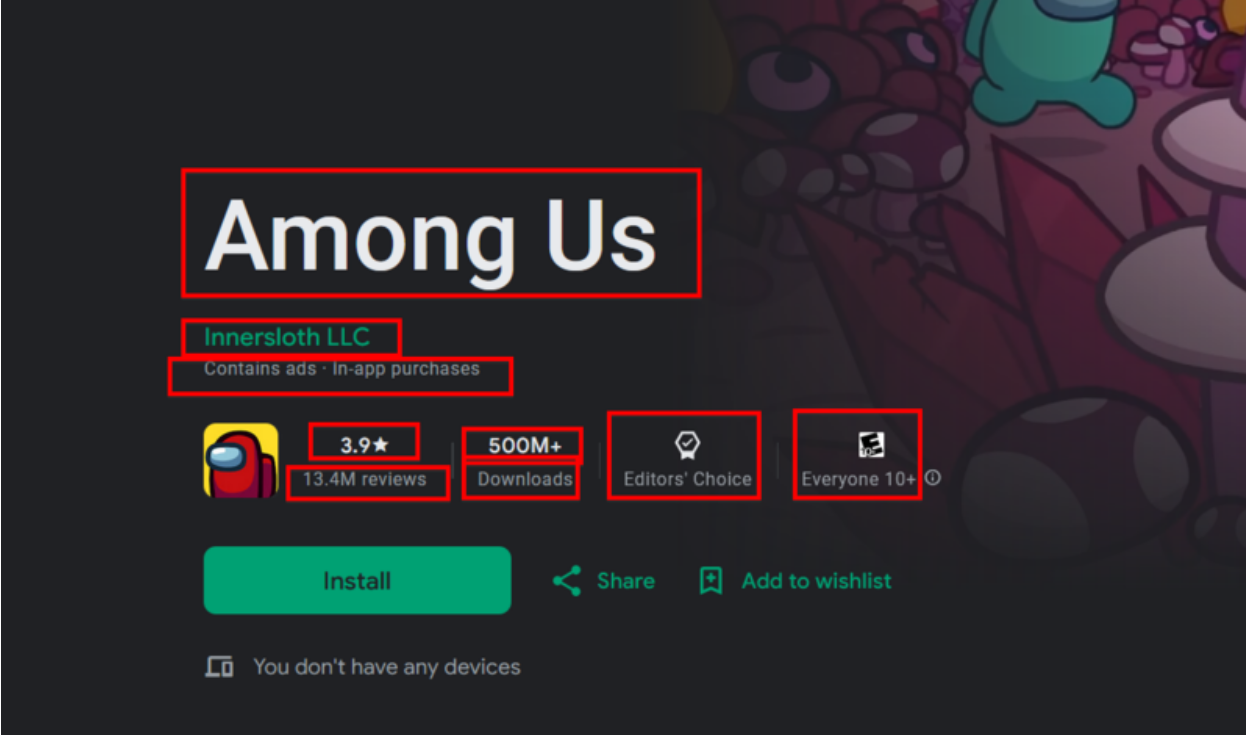
Using the Inspector tool, we’ll pinpoint each of these elements and copy their selectors our golden keys to the data kingdom. Ready to roll? Let’s code! 💻💪
First up, we navigate to the app page:
try {
await page.goto(url, {
            waitUntil: "domcontentloaded"
        })
// The rest of the code goes here!
} catch (e) {
       console.error(e.message)
}
Pro tip: Wrap everything in a try-catch block. It’s like a safety net to catch any unexpected bugs that might try to trip us up. 🕸️🐛
Now, let’s get down to business and write the code for each piece of data we want to scrape. We’ll be following a simple three-step process: wait for the element to load, select it, and extract its text content. Easy peasy, right? 😎
For example, The app’s title has a selector ‘h1’, so here’s how we grab it:
// Wait for the title element to appear and extract the app's title
await page.waitForSelector('h1', { timeout: 2000 })
const titleElement = await page.$('h1')
const title = await titleElement.evaluate(t => t.textContent)
Boom! We’ve got the title. 🎯 Let’s do the same for the other data elements:
Scraping the Company Name
// Extract the company's name
await page.waitForSelector('#yDmH0d > c-wiz.SSPGKf.Czez9d > div > div > div:nth-child(1) > div > div.P9KVBf > div > div > c-wiz > div.hnnXjf.XcNflb.J1Igtd > div.qxNhq > div > div > div > div.Vbfug.auoIOc > a > span', { timeout: 2000 })
const companyElement = await page.$('#yDmH0d > c-wiz.SSPGKf.Czez9d > div > div > div:nth-child(1) > div > div.P9KVBf > div > div > c-wiz > div.hnnXjf.XcNflb.J1Igtd > div.qxNhq > div > div > div > div.Vbfug.auoIOc > a > span')
const company = await companyElement.evaluate(c => c.textContent)
Checking for Ads
// Check if the app contains ads
await page.waitForSelector('#yDmH0d > c-wiz.SSPGKf.Czez9d > div > div > div:nth-child(1) > div > div.P9KVBf > div > div > c-wiz > div.hnnXjf.XcNflb.J1Igtd > div.qxNhq > div > div > div > div.ulKokd > div', { timeout: 2000 })
const adsElement = await page.$('#yDmH0d > c-wiz.SSPGKf.Czez9d > div > div > div:nth-child(1) > div > div.P9KVBf > div > div > c-wiz > div.hnnXjf.XcNflb.J1Igtd > div.qxNhq > div > div > div > div.ulKokd > div')
const ads = await adsElement.evaluate(a => a.textContent)
Scraping the App’s Rating
// Extract the app's rating
await page.waitForSelector('#yDmH0d > c-wiz.SSPGKf.Czez9d > div > div > div:nth-child(1) > div > div.P9KVBf > div > div > c-wiz > div.hnnXjf.XcNflb.J1Igtd > div.JU1wdd > div > div > div:nth-child(1) > div.ClM7O', { timeout: 2000 })
const ratingElement = await page.$('#yDmH0d > c-wiz.SSPGKf.Czez9d > div > div > div:nth-child(1) > div > div.P9KVBf > div > div > c-wiz > div.hnnXjf.XcNflb.J1Igtd > div.JU1wdd > div > div > div:nth-child(1) > div.ClM7O')
const rating = await ratingElement.evaluate(r => r.textContent)
Scraping the Number of Reviews
// Extract the number of reviews
await page.waitForSelector('#yDmH0d > c-wiz.SSPGKf.Czez9d > div > div > div:nth-child(1) > div > div.P9KVBf > div > div > c-wiz > div.hnnXjf.XcNflb.J1Igtd > div.JU1wdd > div > div > div:nth-child(1) > div.g1rdde', { timeout: 2000 })
const reviewElement = await page.$('#yDmH0d > c-wiz.SSPGKf.Czez9d > div > div > div:nth-child(1) > div > div.P9KVBf > div > div > c-wiz > div.hnnXjf.XcNflb.J1Igtd > div.JU1wdd > div > div > div:nth-child(1) > div.g1rdde')
const review = await reviewElement.evaluate(r => r.textContent)
Scraping the Number of Downloads
// Extract the number of downloads
await page.waitForSelector('#yDmH0d > c-wiz.SSPGKf.Czez9d > div > div > div:nth-child(1) > div > div.P9KVBf > div > div > c-wiz > div.hnnXjf.XcNflb.J1Igtd > div.JU1wdd > div > div > div:nth-child(2) > div.ClM7O', { timeout: 2000 })
const downloadsElement = await page.$('#yDmH0d > c-wiz.SSPGKf.Czez9d > div > div > div:nth-child(1) > div > div.P9KVBf > div > div > c-wiz > div.hnnXjf.XcNflb.J1Igtd > div.JU1wdd > div > div > div:nth-child(2) > div.ClM7O')
const downloads = await downloadsElement.evaluate(d => d.textContent)
And voila! 🥳 We’ve got all the data we need. Now let’s wrap it up nicely into one object:
return {
      title,
      company,
      ads,
      rating,
      review,
      downloads
}
Collect all data in one array
Now that our extract function is up and running, it’s time to send it out to do its thing. We’ll loop through all our app URLs, use the extract to gather the data, and store everything in a shiny array. This array will be our treasure chest, full of all the app data we’ve scraped! 🏴☠️💎
const appData = []
    for (let link of links) {
        try {
            const data = await extract(link)
            appData.push(data)
        } catch (e) {
            console.error(e.message)
            await extract(link)
        }


    }
Saving the data in a JSON file
We’re almost at the finish line! 🏁 Now that we’ve collected all the data in our appData array, it’s time to store it in a format we can easily use later—JSON. JSON (JavaScript Object Notation) is a lightweight format for storing and transporting data, making it perfect for saving the information we’ve scraped.
Here’s how we can do it:
1- Import the fs module:
First, we need to bring in Node.js’s built-in fs (File System) module, which allows us to interact with the file system.
2- Convert the data to JSON:
We then need to convert our appData array into a JSON string. This can be done easily using JSON.stringify().
3- Save the data:
Finally, we write this JSON string to a file using fs.writeFileSync(). This method will create a new file named data.json in our project directory and store the data there.
const fs = require('fs')
const stringifiedData = JSON.stringify(appData)
fs.writeFileSync('data.json', stringifiedData)
The file should appear in your file explorer containing all the applications’ data like this:
[
  {
    "title": "Subway Surfers",
    "company": "SYBO Games",
    "ads": "Contains adsIn-app purchases",
    "rating": "3.9star",
    "review": "41.5M reviews",
    "downloads": "1B+"
  },
  {
    "title": "Among Us",
    "company": "Innersloth LLC",
    "ads": "Contains adsIn-app purchases",
    "rating": "3.3star",
    "review": "13.4M reviews",
    "downloads": "500M+"
  },
  {
    "title": "Zooba: Fun Battle Royale Games",
    "company": "Wildlife Studios",
    "ads": "In-app purchases",
    "rating": "4.4star",
    "review": "1.47M reviews",
    "downloads": "100M+"
  },
Finally, we can close the browser after everything is completed:
await browser.close()
console.log(appData)
Conclusion
And there you have it! 🎉 We’ve successfully navigated through the entire process of scraping the Google Play Store using Puppeteer and Node.js, from searching for apps to extracting detailed information from each app page.
What started as a simple idea has now transformed into a fully functional web scraping script. Not only have we gathered valuable data, but we’ve also learned how to automate the browser, work with page selectors, and handle unexpected challenges along the way.
Whether you’re looking to analyze app trends, gather competitive intelligence, or simply satisfy your curiosity, this script provides a solid foundation to build upon. The possibilities are endless, and with some tweaks and expansions, you can take this even further.
So go ahead run your script, explore the data, and see what insights you can uncover. Happy scraping! 🚀🔍
For those eager to dive right in, the full script can be found in this GitHub Repo.


Responses